
VitePress 搭建个人博客/知识库
快速开始
前置准备
- Node.js 18及以上版本
- npm或pnpm、yarn包管理工具
安装&初始化
sh
# 创建项目文件夹并切换
$ mkdir vitepress && cd vitepress
# 安装vitepress
$ npm add -D vitepress
# 安装向导
$ npx vitepress init
将回答几个问题,下面是我的项目选择:
Theme
Theme可以选择第二项,单纯觉得好看点,其实都可以配置的
markdown
┌ Welcome to VitePress!
│
◇ Where should VitePress initialize the config?
│ ./docs
│
◇ Site title:
│ My Awesome Project
│
◇ Site description:
│ A VitePress Site
│
◆ Theme:
│ ○ Default Theme
│ ● Default Theme + Customization (Add custom CSS and layout slots)
│ ○ Custom Theme
└
现在可以启动项目啦 🎉
sh
$ npm run docs:dev除了脚本,还可以直接调用VitePress
sh
$ npx vitepress dev docs到这里,项目初期的建设任务九基本完工!
项目配置
废话不多说,直接上配置代码
- index.md("docs/index.md"):首页信息内容配置文件
- config.mts("docs/.vitepress/config.mts"):项目配置文件
markdown
---
layout: home

hero:
  name: 'BieFlow'
  text: '这个知识库不是收藏夹,是「知识外挂」'
  tagline: 🚀 随时召唤,拒绝白学
  image:
    src: /logo.png
    alt: logo
  actions:
    - theme: brand
      text: 开始使用
      link: /markdown-examples
    - theme: alt
      text: 支持项目
      link: /markdown-examples
    - theme: alt

features:
  - icon: 🛠️
    title: 开源
    details: 每个人都可以自由搭建
  - icon: 🎉
    title: 免费
    details: 前端开发者都可以随时免费查阅,共同进步
  - icon: 📡
    title: 共享
    details: 任何人都可以一起补充文库,欢迎你的来到
---
ts
import { defineConfig } from 'vitepress'

export default defineConfig({
  lang: 'zh-Hans',
  title: 'BieFlow知识库',
  // 描述
  description: 'A VitePress Site',
  base: '/docs/', // 项目根目录
  srcDir: 'docs', // 源目录
  // head中的logo
  head: [
    [
      'link',
      {
        rel: 'icon',
        href: '/blog/logo.png',
      },
    ],
  ],
  themeConfig: {
    // 页面左上角logo
    logo: '/logo.png',
    // 导航菜单
    nav: [
      { text: 'Home', link: '/' },
      { text: 'Examples', link: '/markdown-examples' },
    ],
    // 文章左侧菜单
    sidebar: [
      {
        text: 'Examples',
        items: [
          { text: 'Markdown Examples', link: '/markdown-examples' },
          { text: 'Runtime API Examples', link: '/api-examples' },
        ],
      },
    ],
    // 文章右侧目录
    outline: {
      label: '目录',
      level: [2, 4], // 目录层级,默认只显示二级标题
    },
    // 搜索框
    search: {
      provider: 'local',
      options: {
        translations: {
          button: {
            buttonText: '搜索文档',
            buttonAriaLabel: '搜索文档',
          },
          modal: {
            noResultsText: '无法找到相关结果',
            resetButtonTitle: '清除查询条件',
            footer: {
              selectText: '选择',
              navigateText: '切换',
              closeText: '退出',
            },
          },
        },
      },
    },
    // 文件最后更新时间,提交到git才会显示
    lastUpdated: {
      text: '更新时间',
      formatOptions: {
        dateStyle: 'short',
        timeStyle: 'short',
      },
    },
    // 翻页设置
    docFooter: {
      prev: '上一页',
      next: '下一页',
    },
    // 分享icon
    socialLinks: [
      { icon: 'github', link: 'https://github.com/bieber-fe' },
      {
        icon: {
          svg: '<svg t="1747993515198" class="icon" viewBox="0 0 1024 1024" version="1.1" xmlns="http://www.w3.org/2000/svg" p-id="2594" width="200" height="200"><path d="M512 1024C229.2224 1024 0 794.7776 0 512S229.2224 0 512 0s512 229.2224 512 512-229.2224 512-512 512z m259.1488-568.8832H480.4096a25.2928 25.2928 0 0 0-25.2928 25.2928l-0.0256 63.2064c0 13.952 11.3152 25.2928 25.2672 25.2928h177.024c13.9776 0 25.2928 11.3152 25.2928 25.2672v12.6464a75.8528 75.8528 0 0 1-75.8528 75.8528H366.592a25.2928 25.2928 0 0 1-25.2672-25.2928v-240.1792a75.8528 75.8528 0 0 1 75.8272-75.8528h353.9456a25.2928 25.2928 0 0 0 25.2672-25.2928l0.0768-63.2064a25.2928 25.2928 0 0 0-25.2672-25.2928H417.152a189.6192 189.6192 0 0 0-189.6192 189.6448v353.9456c0 13.9776 11.3152 25.2928 25.2928 25.2928h372.9408a170.6496 170.6496 0 0 0 170.6496-170.6496v-145.408a25.2928 25.2928 0 0 0-25.2928-25.2672z" fill="#C71D23" p-id="2595"></path></svg>',
        },
        link: 'https://gitee.com/bieber-fe',
      },
      {
        icon: {
          svg: '<svg t="1747993865703" class="icon" viewBox="0 0 1316 1024" version="1.1" xmlns="http://www.w3.org/2000/svg" p-id="1675" width="200" height="200"><path d="M643.181714 247.698286l154.916572-123.172572L643.181714 0.256 643.072 0l-154.660571 124.269714 154.660571 123.245715 0.109714 0.182857z m0 388.461714h0.109715l399.579428-315.245714-108.361143-87.04-291.218285 229.888h-0.146286l-0.109714 0.146285L351.817143 234.093714l-108.251429 87.04 399.433143 315.136 0.146286-0.146285z m-0.146285 215.552l0.146285-0.146286 534.893715-422.034285 108.397714 87.04-243.309714 192L643.145143 1024 10.422857 525.056 0 516.754286l108.251429-86.893715L643.035429 851.748571z" fill="#1E80FF" p-id="1676"></path></svg>',
        },
        link: 'https://juejin.cn/user/254742426300760/posts',
      },
    ],
    // 404页面
    notFound: {
      title: '未找到页面,迷路了~',
      quote: '请检查地址是否正确,或当前页面未开通,点击下方按钮返回首页',
      linkText: '返回首页',
    },
    // 底部版权
    footer: {
      message: '基于 MIT 许可发布',
      copyright: '版权所有 © 2023-2025 比伯',
    },
  },
})
以上说明
部署Github Pages
注册账号&新建仓库
在 Github 上注册账号,创建仓库,注意仓库的名称需要在config.mts里base的配置一致,说过啦!
初始化git仓库
1. 在项目中初始化git
sh
$ git init2. 添加.gitignore文件
node_modules
.DS_Store
dist
dist-ssr
cache
.cache
.temp
*.local
3. 提交到远程仓库
sh
git add .
git commit -m "first commit"
git remote add origin git@github.com:userName/repositoryName.git
git push -u origin main
部署&自动发布
- 打开仓库:选择Settings -> Pages -> Source -> Github Actions

- 设置工作流:Actions -> set up a workflow yourself
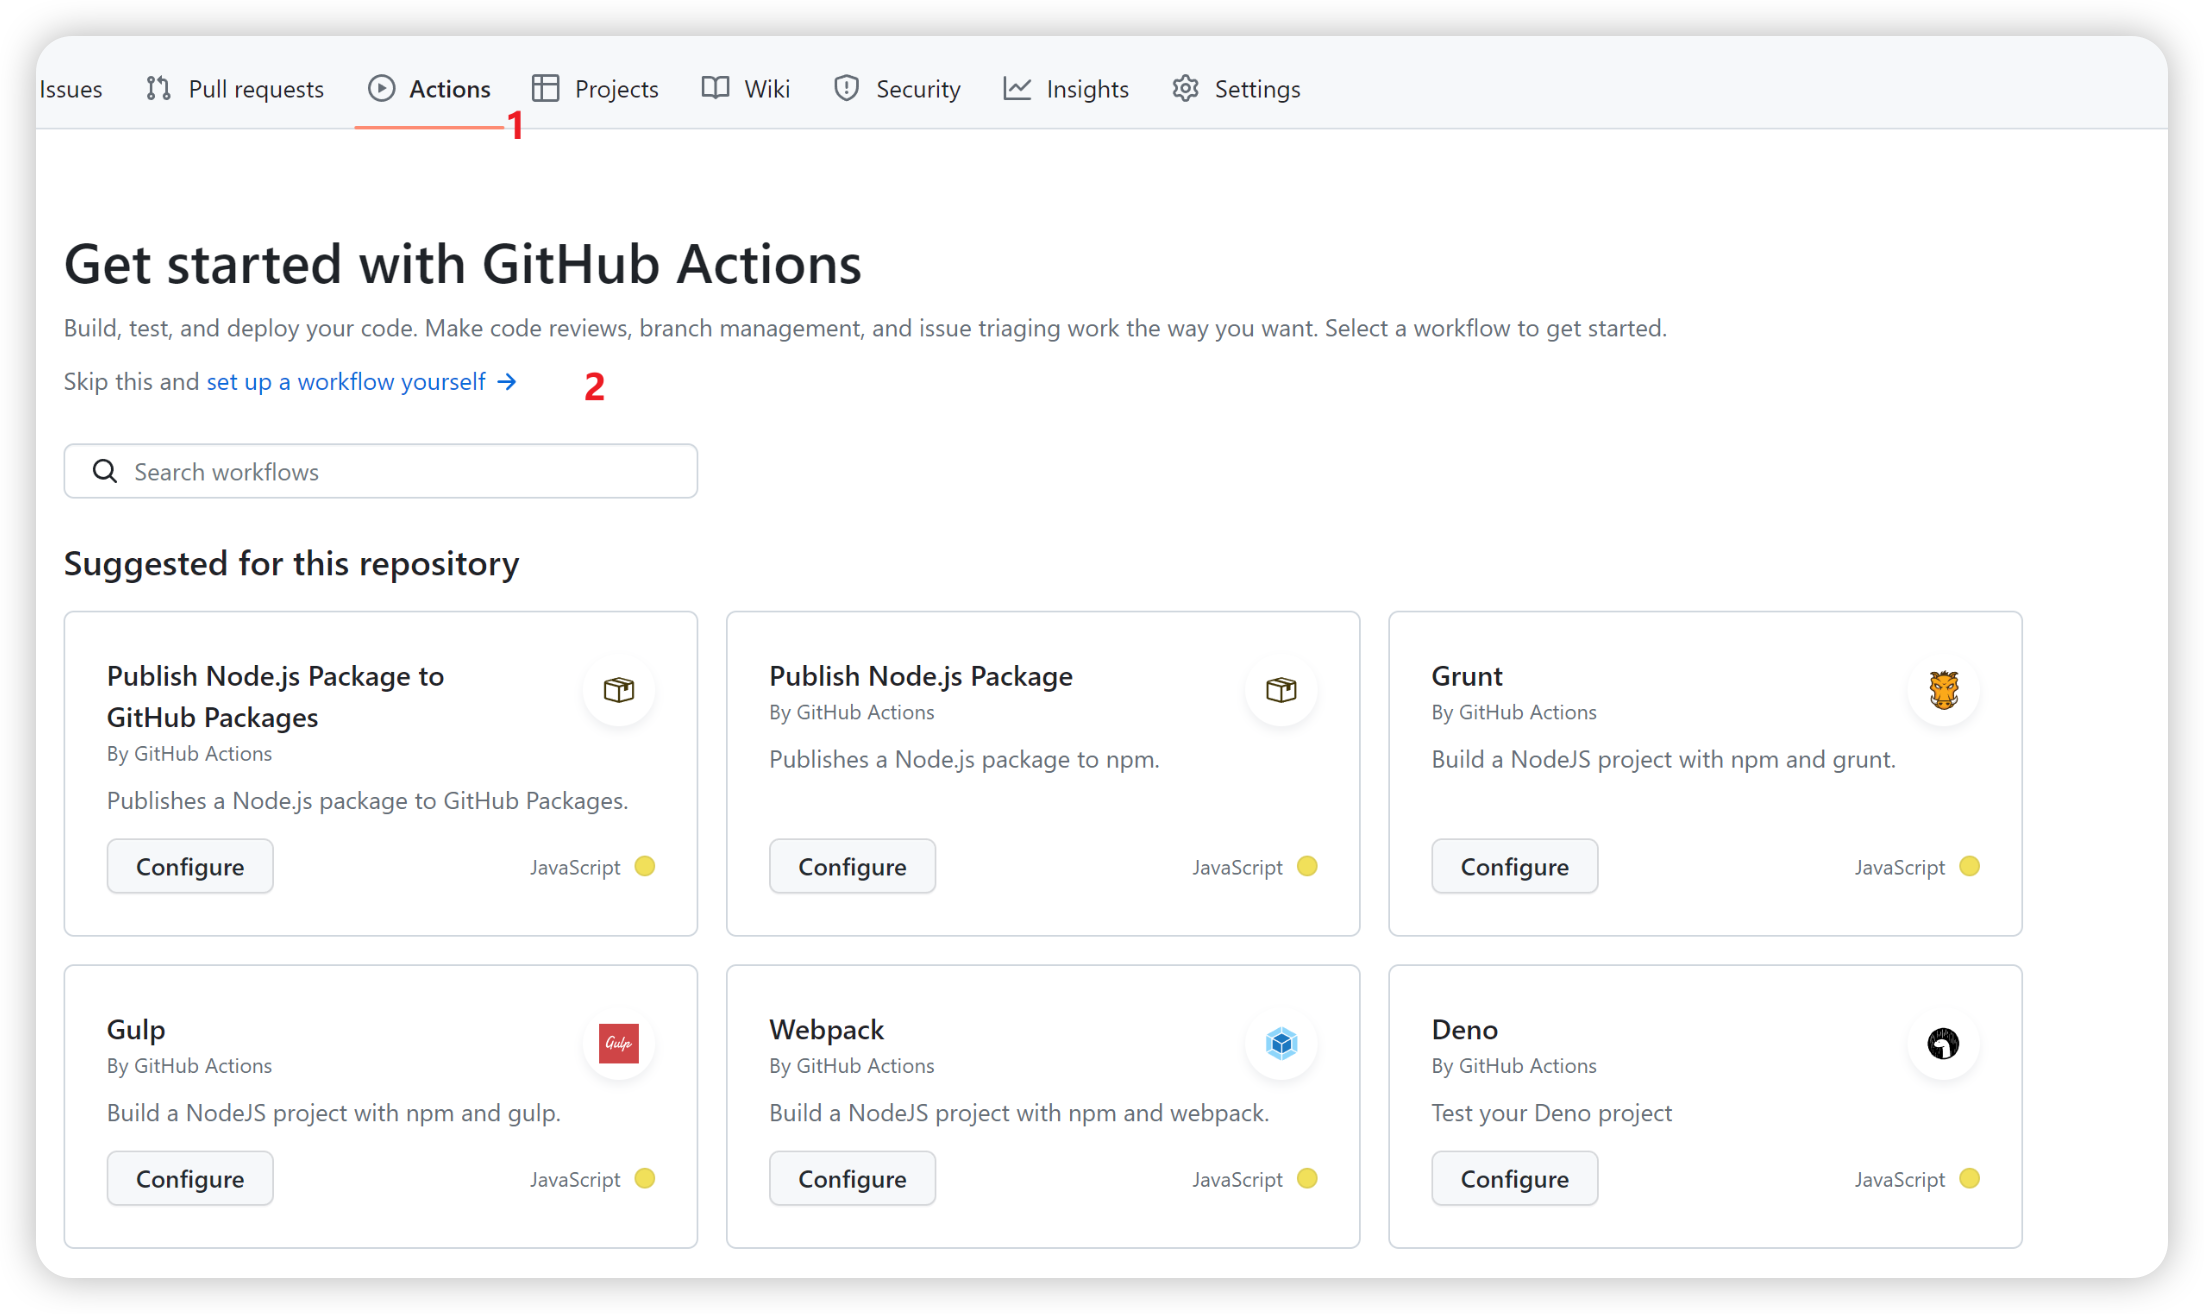
- 复制 VitePress官方文档 脚本到内容区域,并重命名文件deploy.yml
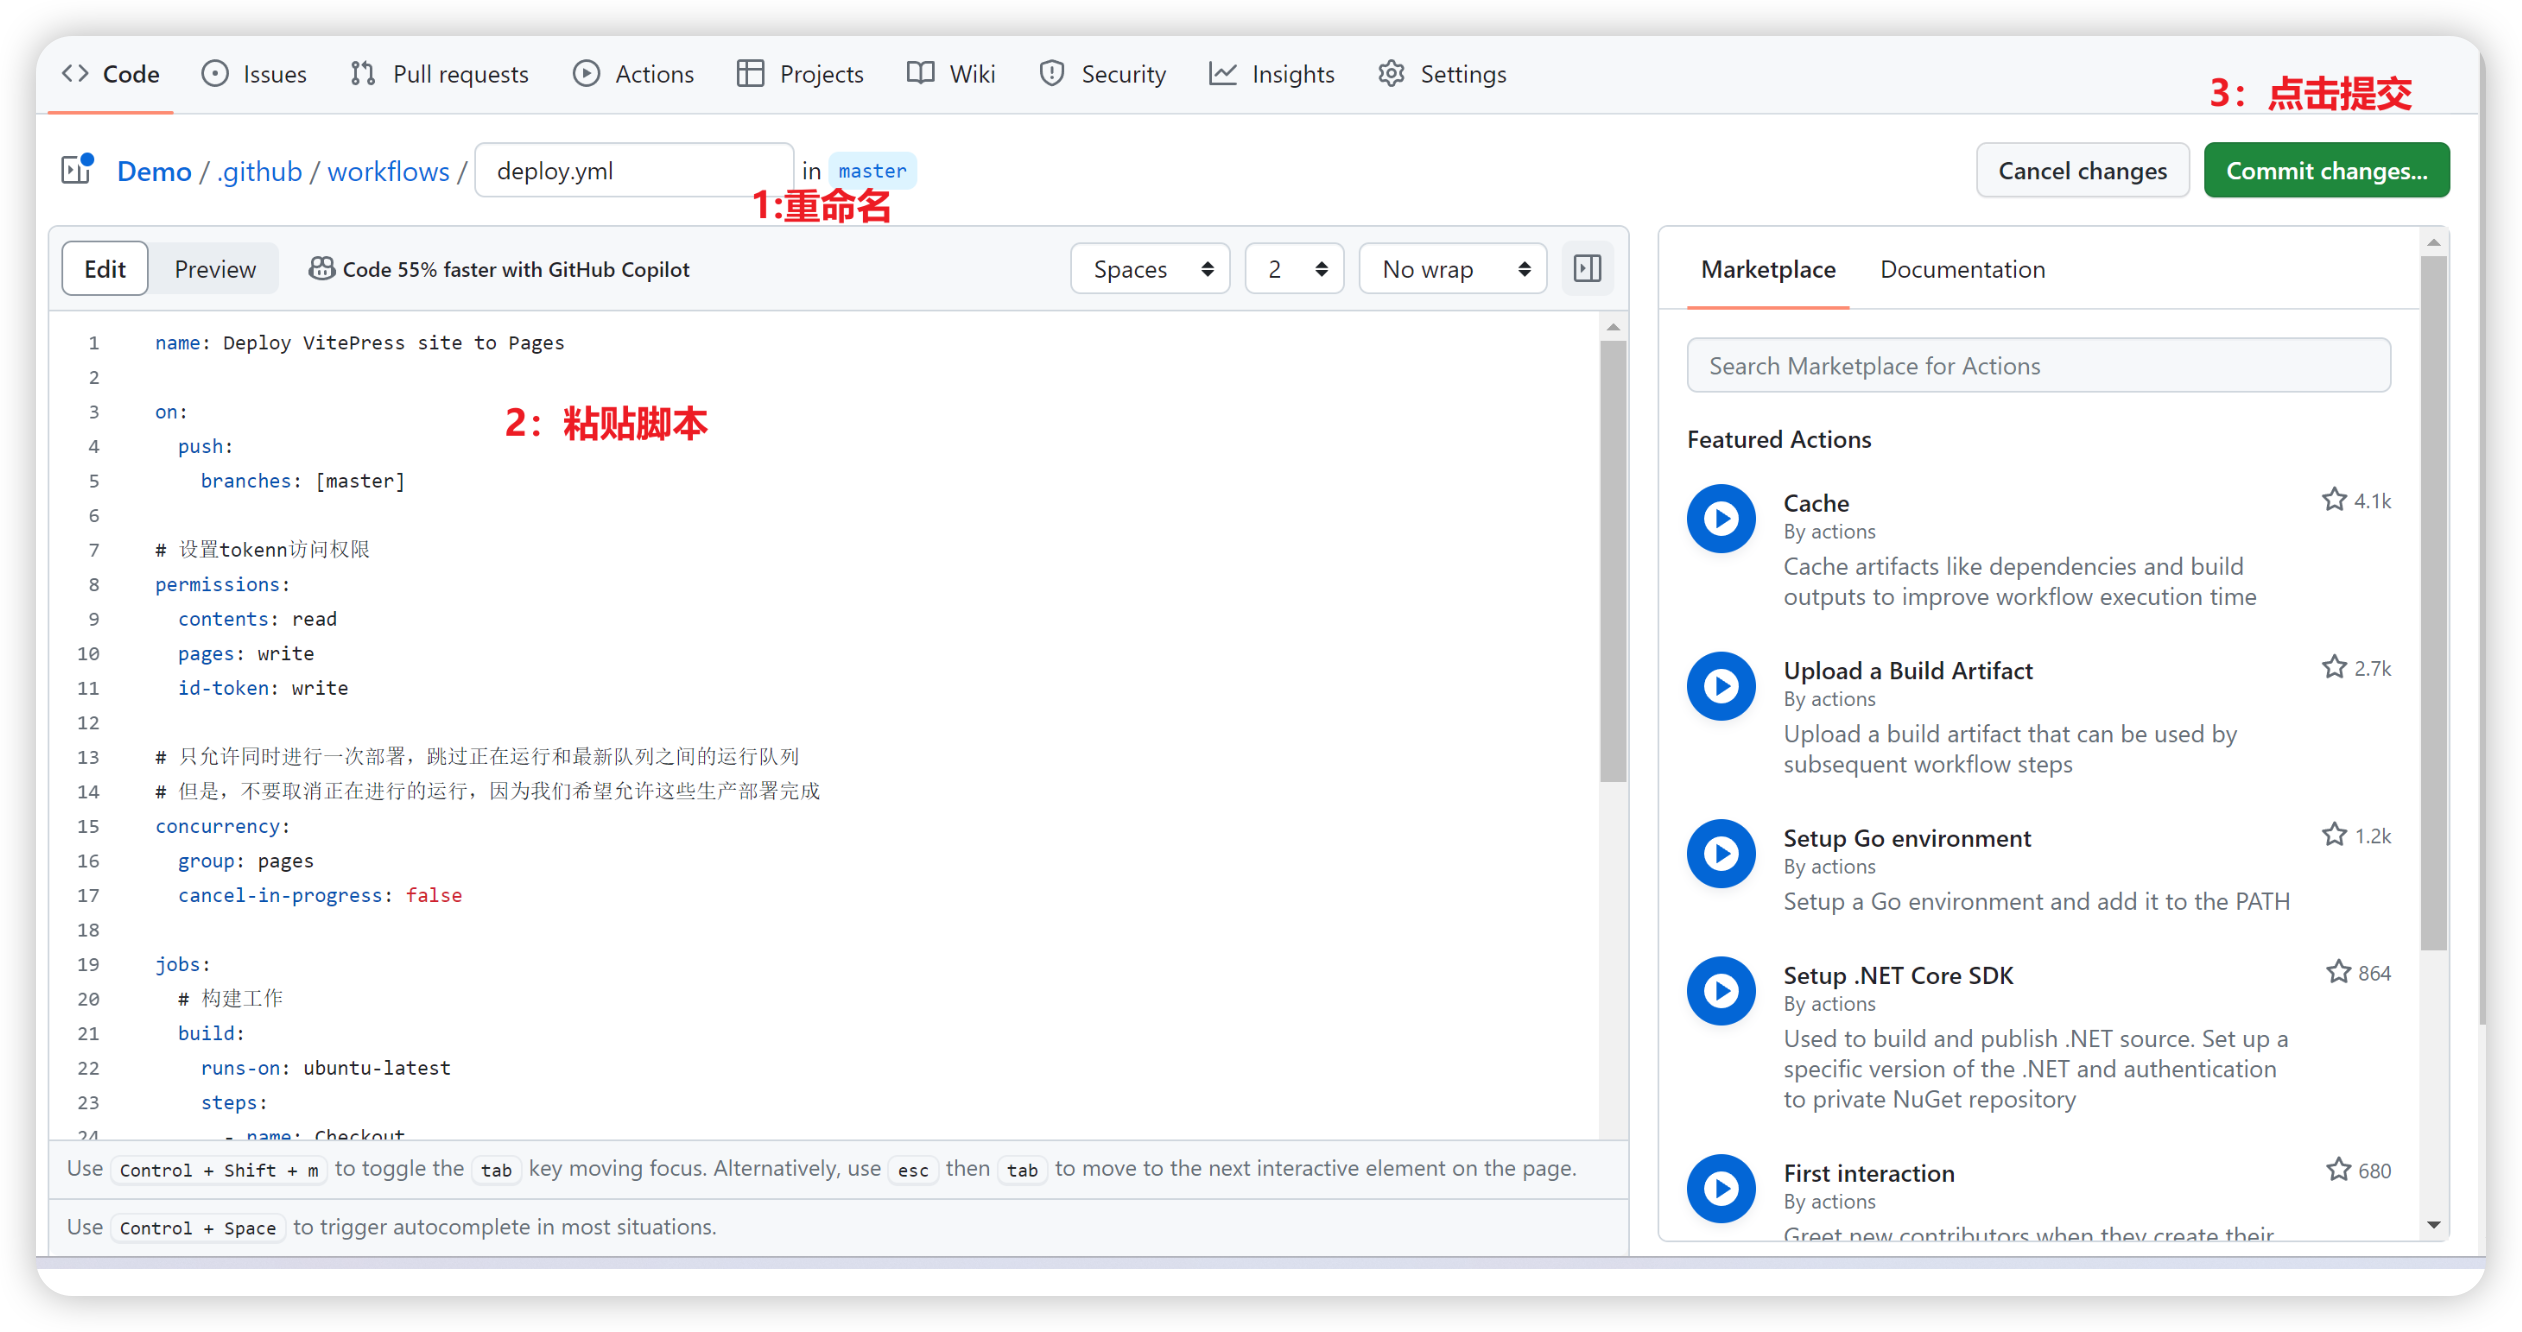
- 等待15秒左右,就可以在Settings -> Pages中看到域名了

- 这样就可以push代码以后,自动发布了,无需过多操作
插件优化
首页增加五彩纸屑 canvas-confetti
1. 安装
sh
$ npm add canvas-confetti2. 创建组件docs/components/confetti.vue, 并在首页使用引入组件
markdown
---
layout: home
hero: ...
features: ...
---

<script setup>
import confetti from "../component/confetti.vue"
</script>
<!-- 引入首页碎纸屑效果 -->
<confetti />
vue
<script setup lang="ts">
import confetti from 'canvas-confetti'
import { inBrowser } from 'vitepress'
if (inBrowser) {
  /* 纸屑 */
  confetti({
    particleCount: 100,
    spread: 70,
    origin: { y: 0.6 },
  })
}
</script>
添加评论板块
1. 安装插件
sh
$ npm add -D @giscus/vue2. 配置
打开 giscus文档,来到配置:  填写仓库,需满足红色框中的要求
- 最好新建一个空的Github仓库,是public(公开)的
- 安装giscus app应用,App安装地址,点进去就行,按步骤操作直接完成就行
- 打开仓库Discussions,参考settings下拉,找到Discussions勾选上就行
- Discussions分类,选择(announcements)类型的分类就可以 选择完成,在下面的giscus代码片段中,记住
data-repo、data-repo-id、data-category、data-category-id这四个属性值就行
3. 使用
在docs/components/layout.vue创建layout.vue文件,并且.vitepress/theme/index.mts中引入
vue
<script setup>
import Giscus from '@giscus/vue'
import DefaultTheme from 'vitepress/theme'
import { watch } from 'vue'
import { inBrowser, useData } from 'vitepress'

const { isDark, page } = useData()
const { Layout } = DefaultTheme
watch(isDark, (dark) => {
  if (!inBrowser) return

  const iframe = document.querySelector('giscus-widget')?.shadowRoot?.querySelector('iframe')

  iframe?.contentWindow?.postMessage(
    { giscus: { setConfig: { theme: dark ? 'dark' : 'light' } } },
    'https://giscus.app',
  )
})
</script>

<template>
  <Layout>
    <template #doc-footer-before> </template>
    <template>
      <div style="margin-top: 24px">
        <Guscus
          :key="page.filePath"
          repo="[生成的data-repo的值]"
          repo-id="[生成的data-repo-id的值]"
          category="[生成的data-category的值]"
          category-id="[生成的data-category-id的值]"
          mapping="pathname"
          strict="0"
          reactions-enabled="1"
          emit-metadata="0"
          input-position="top"
          lang="zh-CN"
          crossorigin="anonymous"
          :theme="isDark ? 'dark' : 'light'"
        />
      </div>
    </template>
  </Layout>
</template>
ts
import Theme from 'vitepress/theme'
import layout from '../../component/layout.vue'
import './theme.css'
import { h } from 'vue'

export default {
  Layout: () => {
    return h(layout, null, {})
  },
  extends: Theme,
  enhanceApp({ app }) {},
}
图片放大 medium-zoom
1. 安装
sh
$ npm add medium-zoom -D2. 添加代码,使用组件
ts
// .vitepress/theme/index.mts

import Theme from 'vitepress/theme'
import './theme.css'
// 评论
import layout from '../../component/layout.vue'
import { h } from 'vue'
// 图片放大
import mediumZoom from 'medium-zoom'
import { onMounted, watch, nextTick } from 'vue'
import { useRoute } from 'vitepress'

export default {
  Layout: () => {
    return h(layout, null, {})
  },
  extends: Theme,
  enhanceApp({ app }) {},
  // 图片放大
  setup() {
    const route = useRoute()
    const initZoom = () => {
      // 不显式添加{data-zoomable}的情况下为所有图像启用此功能
      mediumZoom('.main img', { background: 'var(--vp-c-bg)' })
    }
    onMounted(() => {
      initZoom()
    })
    watch(
      () => route.path,
      () => nextTick(() => initZoom()),
    )
  },
}
css
/* .vitepress/theme/style.css */
/* 重置样式 */
.medium-zoom-overlay {
  z-index: 30;
}

.medium-zoom-image {
  z-index: 9999 !important;
}